

Host your first website
Deploy a static website on YourWebTech (ywt.ch) using the built-in editor, preview it instantly, and publish it to the web.
Host your first website
YourWebTech lets you create, edit, preview, and publish static websites directly from your browser. Creating a workspace is available on the Free plan; public publishing and custom domains depend on your active static hosting plan.
This guide walks you through the entire process from creating a new site to seeing it live on the internet.
Before you begin
- You need a YourWebTech account. If you do not have one, follow the Register an account guide.
- No coding experience is required to follow along, but basic familiarity with HTML will help you customize your site beyond the starter templates.
- If you want to use a custom domain (like
yourname.ch), you will need a registered domain. See Register your first domain.
What is static hosting?
Static hosting serves pre-built files (HTML, CSS, JavaScript, images) directly to visitors. There is no server-side processing, no database, and no runtime. This makes static sites:
- Fast — files are served instantly with no processing delay.
- Secure — no server-side code means a much smaller attack surface.
- Simple — easy to create, easy to maintain, and easy to understand.
Static hosting is perfect for personal websites, portfolios, landing pages, documentation sites, and small business websites.
Create and publish your site
Go to the Hosting section
Log in to your YourWebTech account and navigate to Website hosting from the header navigation or from the account sidebar.
You will see a list of your existing sites (empty if this is your first time) and a prominent Create New Website button.
Create a new site
Click Create New Website. You will be asked for a display name and a short subdomain, such as my_portfolio. The subdomain becomes your default hostname: my_portfolio.ywt.app.
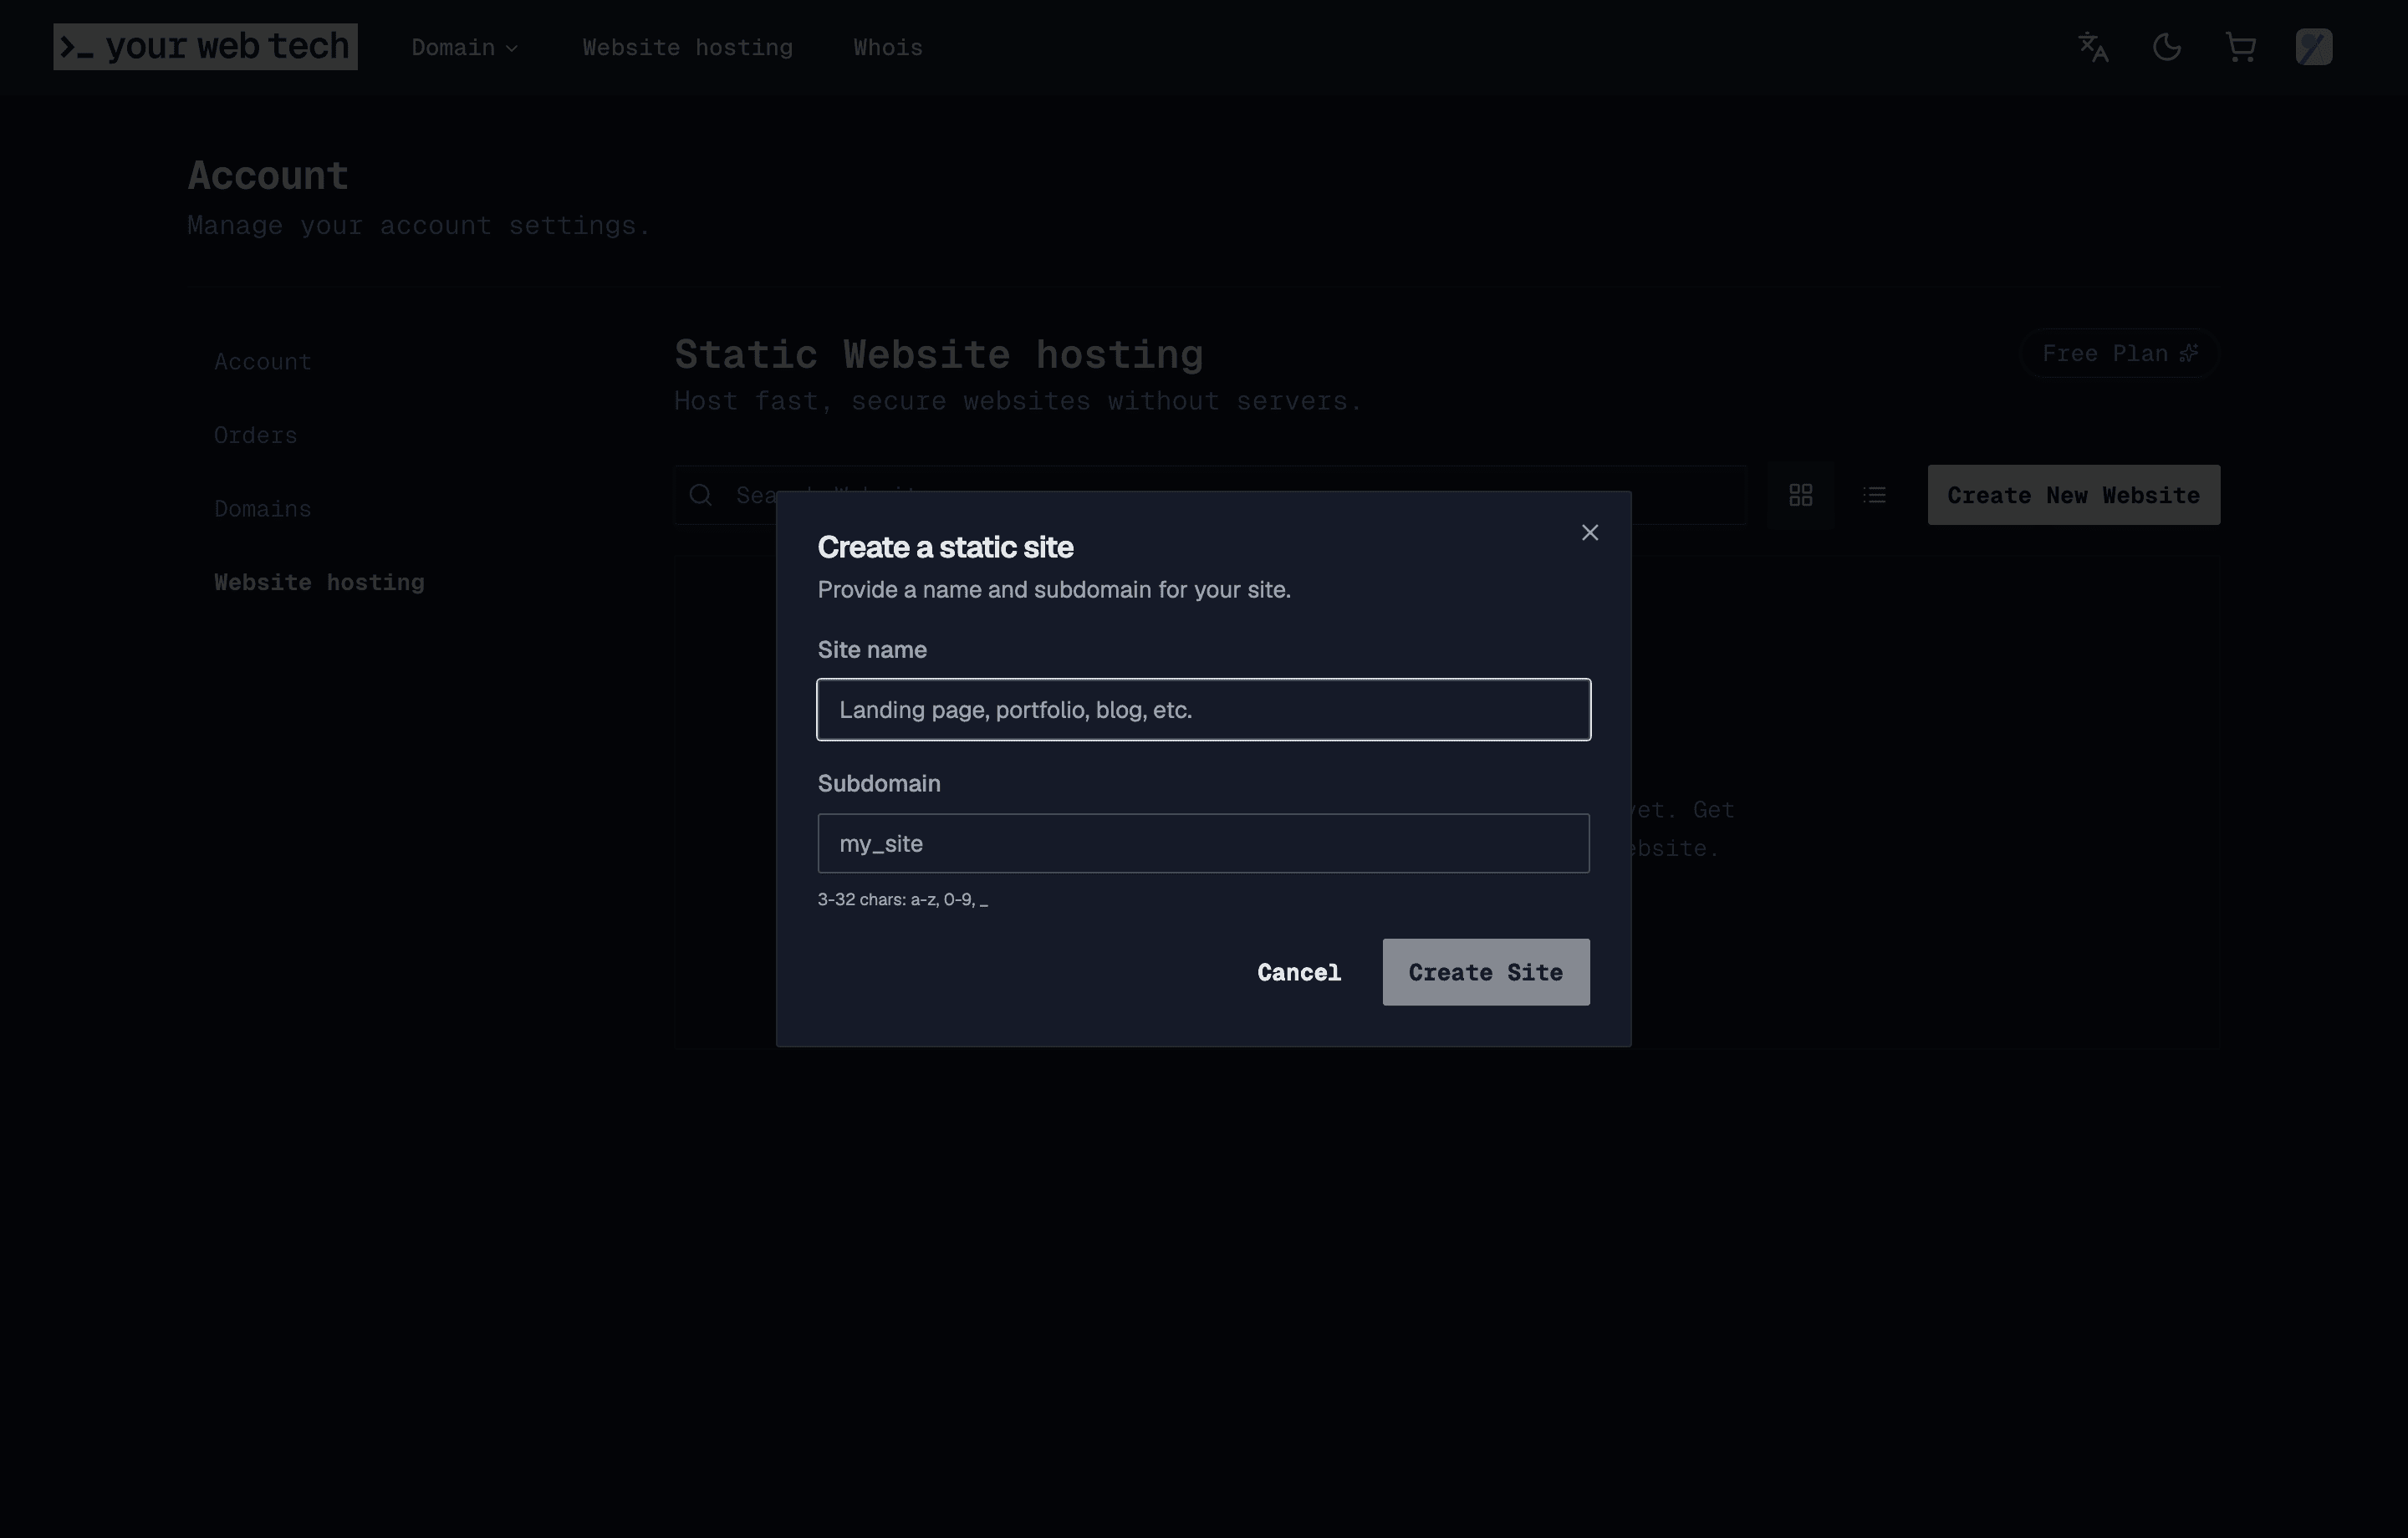
Click Create Site to set up your site.
Choose how to fill your workspace
After creating your site, go to the Workspace tab. If it is empty, you will see several options to get started:
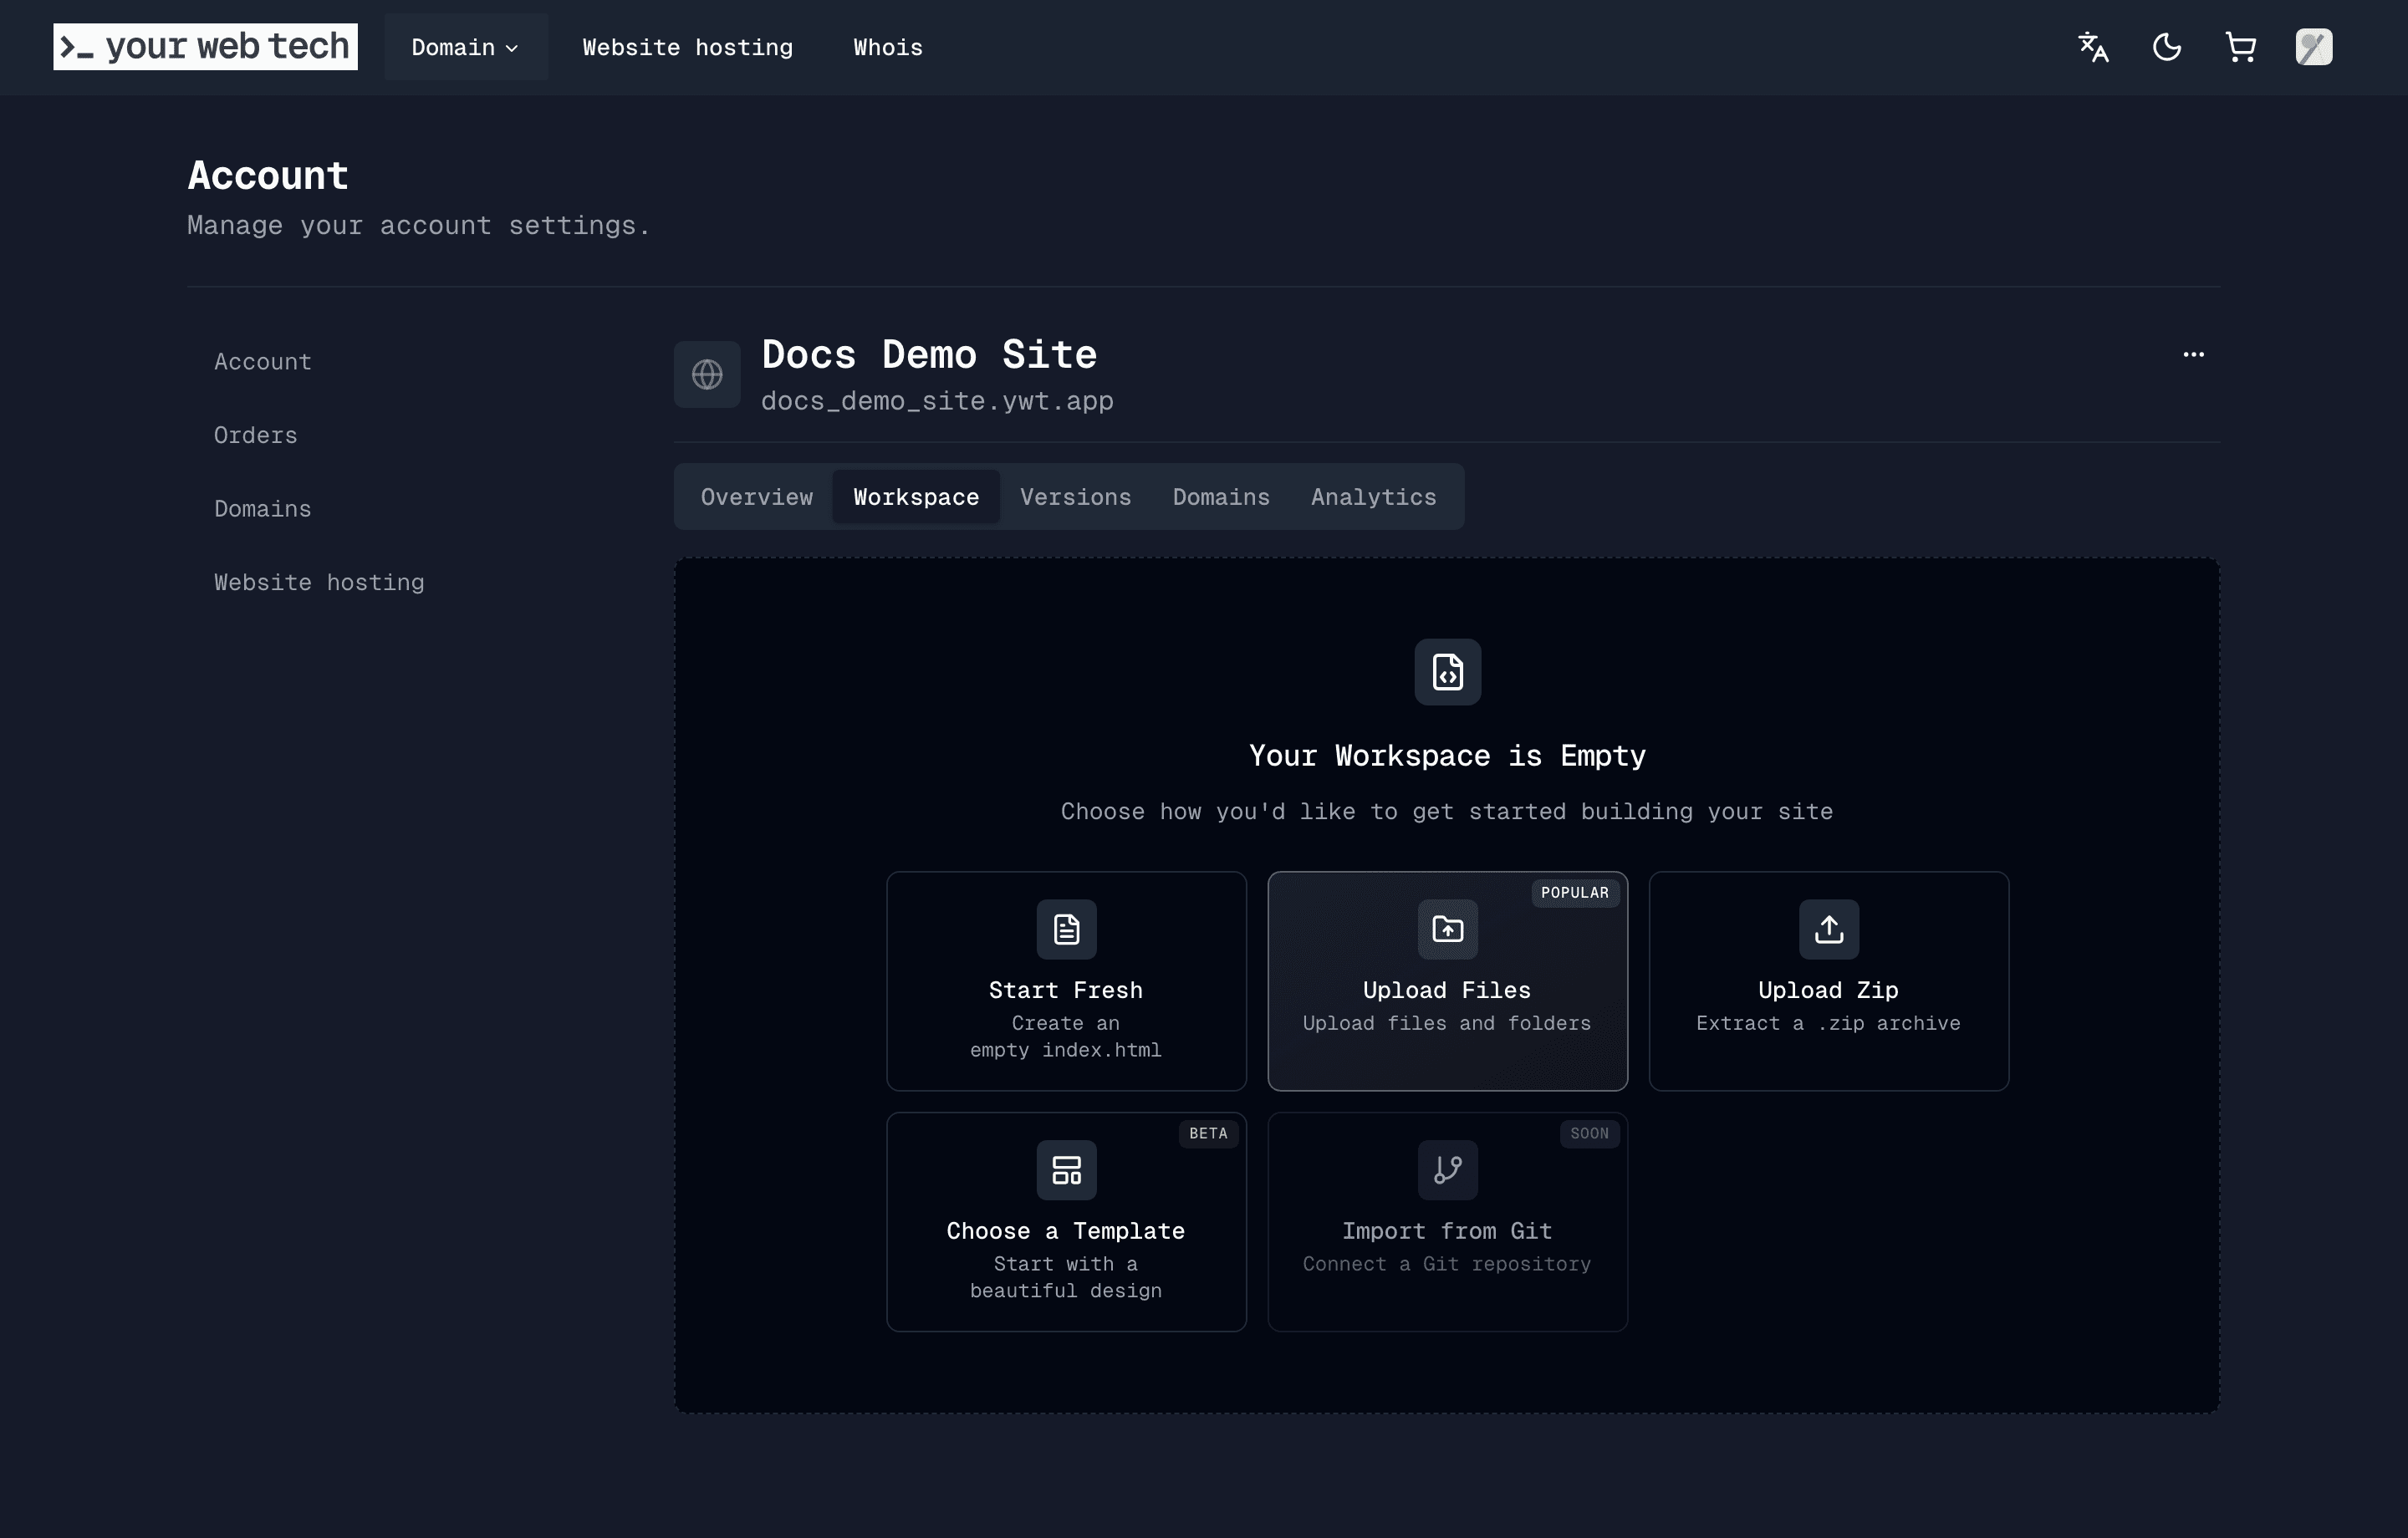
| Option | What it does |
|---|---|
| Start Fresh | Creates an index.html with a starter template. Best if you want a simple starting point to customize. |
| Upload Files | Upload individual files and folders from your computer. |
| Upload Zip | Extract a .zip archive into your workspace. Great for uploading an existing project. |
| Choose a Template | Pick from a gallery of ready-made designs you can customize. |
| Import from Git | Connect a Git repository (coming soon). |
For this guide, pick Start Fresh or Choose a Template to get going quickly.
Edit your site in the Monaco editor
Once your workspace has files, the built-in code editor opens. YourWebTech uses the Monaco editor (the same editor that powers VS Code), so you get a familiar, powerful editing experience right in your browser.
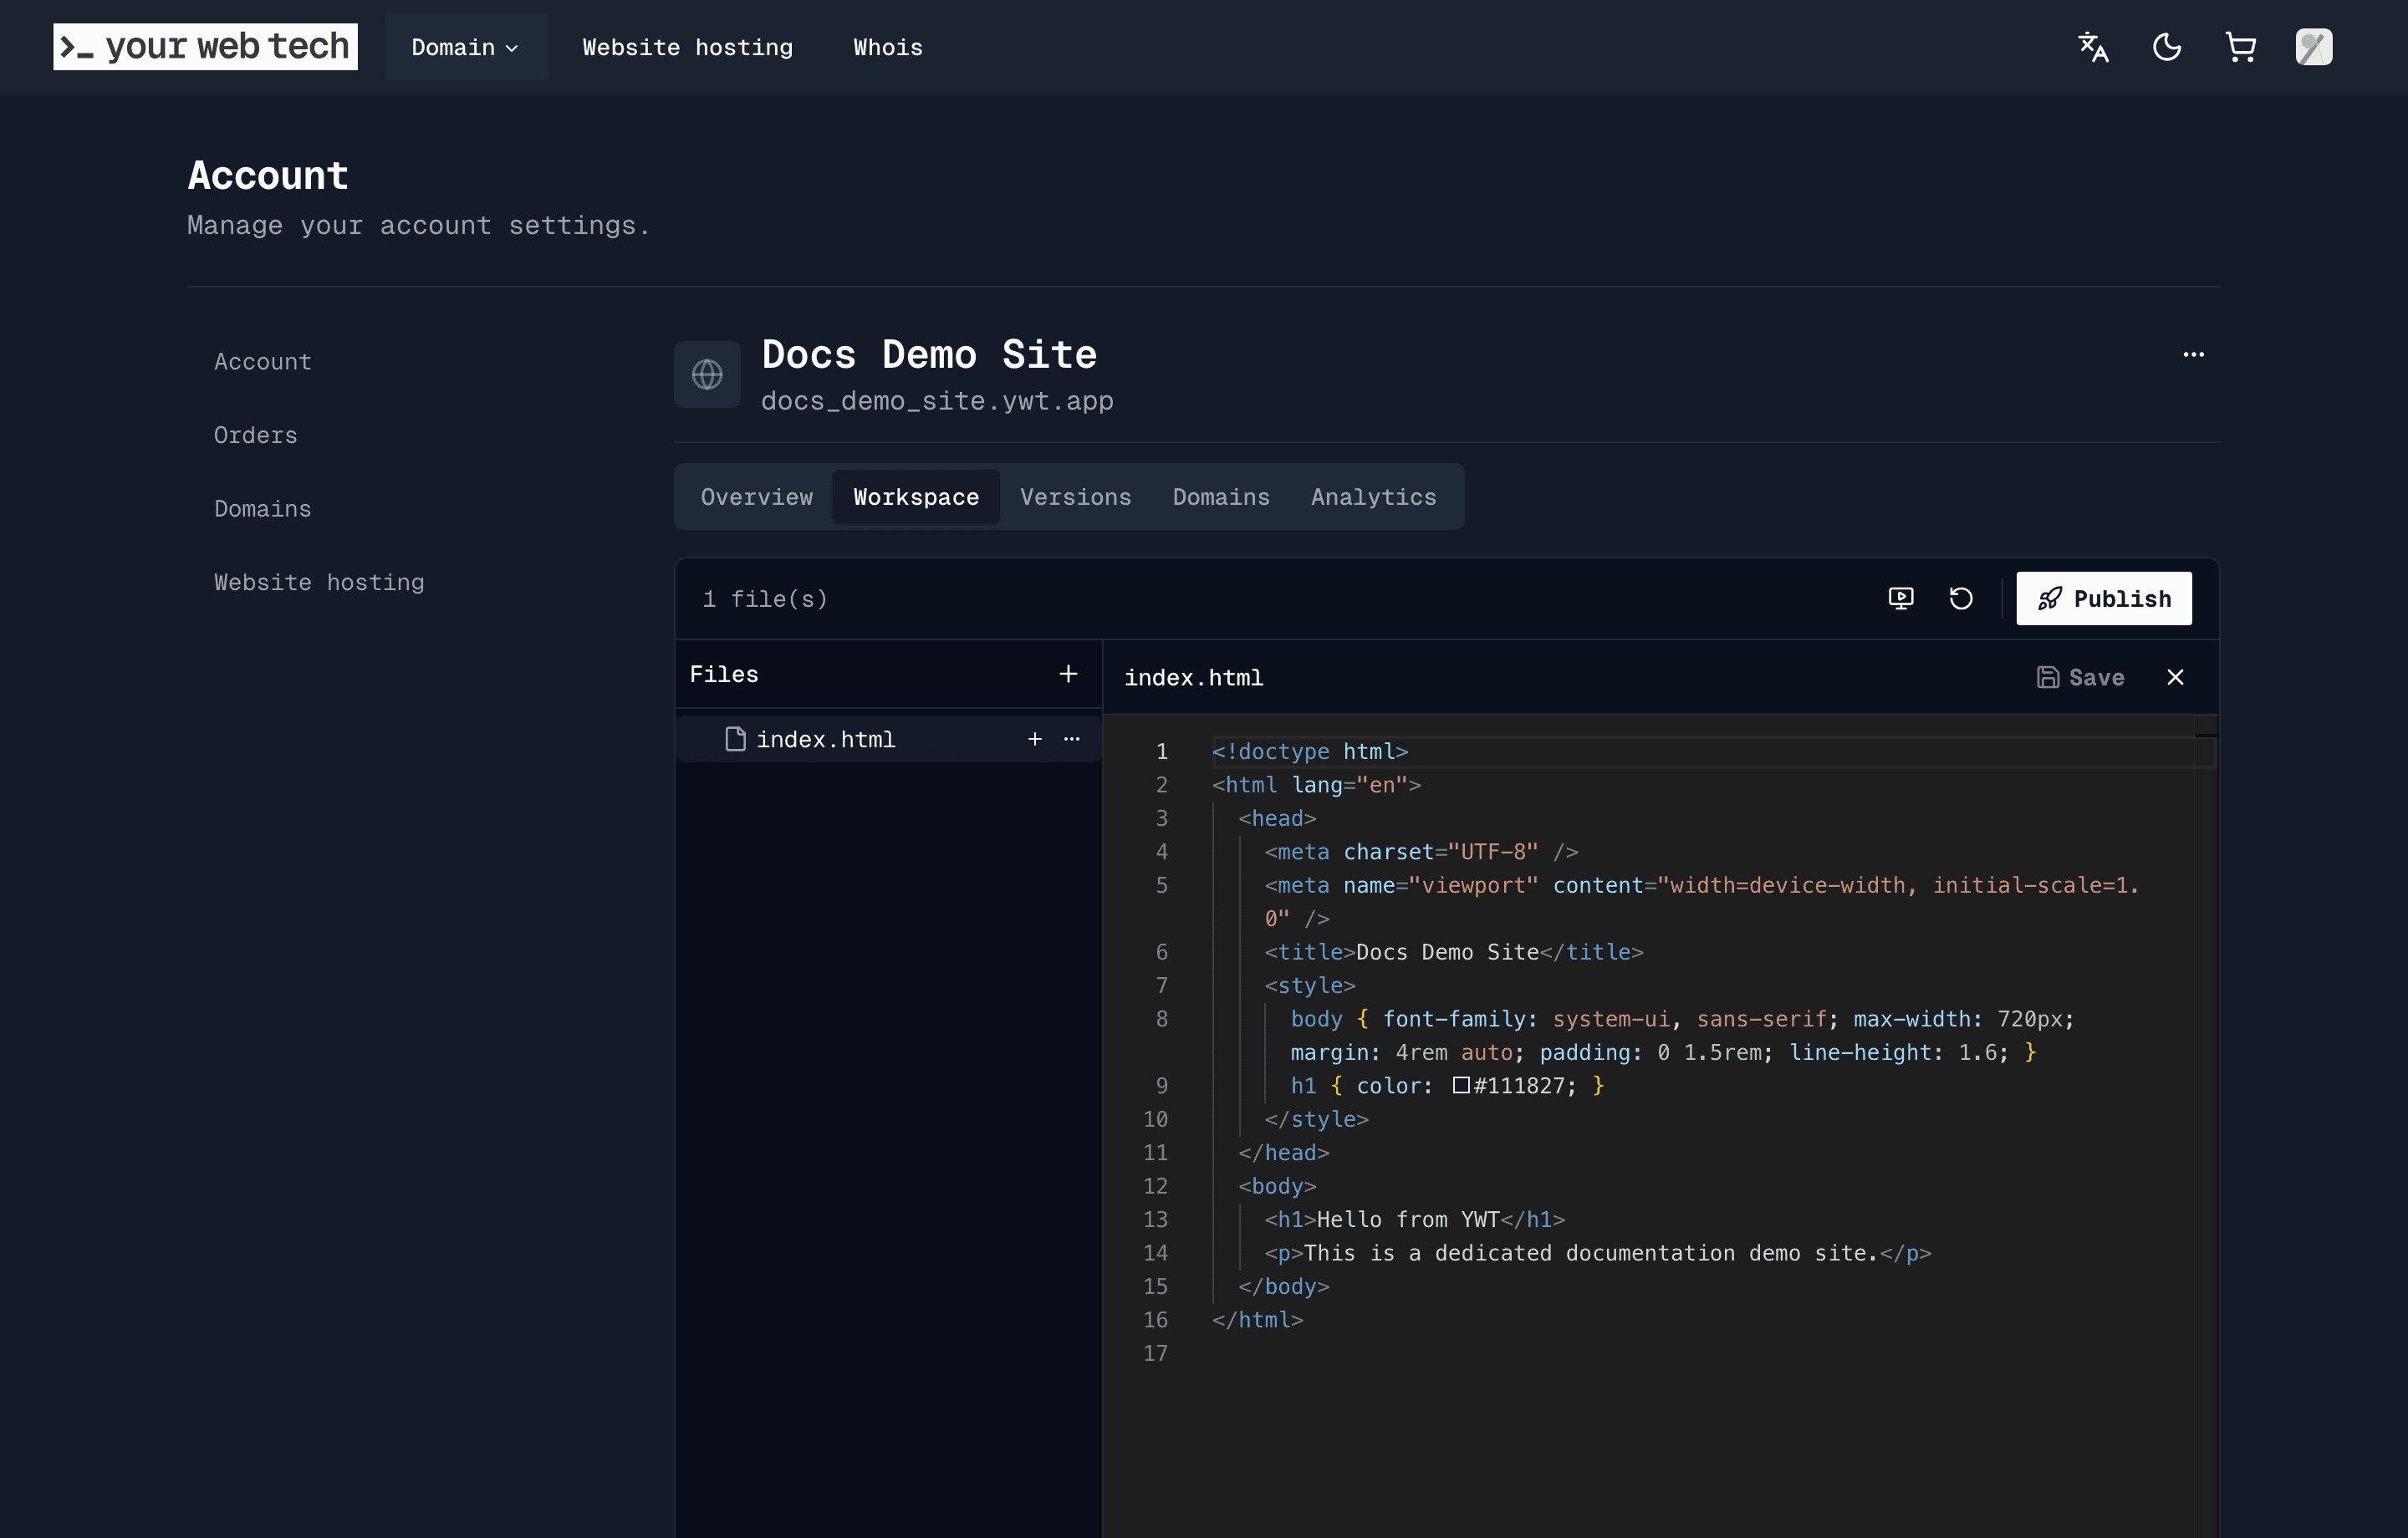
The editor interface includes:
| Area | What it does |
|---|---|
| File tree | Browse, create, rename, and delete files and folders on the left |
| Code editor | Edit file contents with syntax highlighting and auto-complete |
| Toolbar | Preview the workspace, start over, or publish from the top bar |
Start Fresh and most templates create an index.html file you can edit freely. Uploading files or a zip archive keeps the structure you provide, so make sure your project includes an index.html at the root if you want the default path to load.
Here is what a minimal site looks like if you want to start from scratch:
<!DOCTYPE html>
<html lang="en">
<head>
  <meta charset="UTF-8">
  <meta name="viewport" content="width=device-width, initial-scale=1.0">
  <title>My First Website</title>
  <style>
    body {
      font-family: system-ui, -apple-system, sans-serif;
      max-width: 640px;
      margin: 2rem auto;
      padding: 0 1rem;
      color: #1a1a1a;
    }
    h1 { color: #d42a2a; }
  </style>
</head>
<body>
  <h1>Hello from Switzerland!</h1>
  <p>This site is hosted on YourWebTech.</p>
</body>
</html>
You can add more files as needed: CSS stylesheets, JavaScript files, images, and so on. Use the file tree to create new files and folders.
Save changed files with the Save button or Cmd + S / Ctrl + S. Saving updates your workspace; publishing is a separate go-live step.
Preview your site
Click the Preview button in the toolbar. This opens a workspace preview in a new browser tab so you can check the saved files before publishing.
Use the preview to check:
- Layout and design at the browser sizes you care about.
- Links and navigation between pages.
- Images and other media loading correctly.
Save your latest changes before refreshing the preview.
Publish your site
When you are happy with your site, click the Publish button in the toolbar. If your account has an active paid hosting plan, YourWebTech deploys your files and makes the site live within seconds.
Your site is then available at its default URL, such as https://my_portfolio.ywt.app. Share this link with anyone and they can see your website.
If you are still on the Free plan, YWT will ask you to choose a paid hosting plan before public publishing is enabled. You can keep editing and previewing your workspace before upgrading.
Publishing creates a versioned deployment. You can review previous deployments later, open deployment preview URLs, and activate an earlier version when you need to return to known-good files.
Connect a custom domain
Your site starts with a *.ywt.app hostname, but you can connect your own .ch or .li domain if your hosting plan supports custom domains.
To connect a custom domain:
- Go to Website hosting, open your site, and select the Domains page.
- Enter your domain (for example,
yourname.ch). - Add the
_ywt-challengeTXT record and the traffic record shown in YWT. Apex domains use an A record to the YWT edge IP; subdomains use a CNAME torouter.ywt.ch. - Wait for DNS propagation (usually a few minutes, occasionally up to 24 hours).
- Once connected, your site will be accessible at both its
subdomain.ywt.apphostname andyourname.ch.
HTTPS is enabled automatically for all custom domains at no extra cost.
Tips for a great static site
- Keep it fast — minimize large images and unnecessary JavaScript. Static sites are inherently fast; do not slow them down with heavy assets.
- Use semantic HTML — proper heading structure (
h1,h2,h3) and meaningful elements help with accessibility and SEO. - Test on mobile — use the responsive preview to make sure your site looks good on phones and tablets.
- Add a favicon — upload a
favicon.icofile to the root of your project so browsers display your icon in tabs and bookmarks.
Next steps
Your site is live. Here is what to do next:
- Connect a custom domain — if you have not already, register a .ch or .li domain and link it to your site following the steps above.
- Review analytics — after the site receives traffic, use Hosting analytics to see page views, visitors, bandwidth, referrers, countries, devices, and browsers.
- Understand your plan — see Static hosting plans and billing for upgrades, downgrades, cancellation, and renewal.
- Explore templates — try different templates from the empty workspace screen to find a design that suits your needs.
- Manage DNS — learn how to configure DNS records for advanced setups like email routing or third-party service verification.
- Enable DNSSEC — protect your domain from DNS spoofing with DNSSEC.